
Last Updated on March 7, 2021
Recently my sister’s HP 15-cw0055nr laptop was having some keyboard issues, and by issues I mean her cat knocked a beer over and the keyboard drank it all. After letting the HP Laptop dry she cleaned as much of the beer from the top of the keys as well as any beer she could reach from the inside with the back cover off.
After a thorough cleaning the HP 15-cw0055nr still worked and was usable, but a few months later the space bar key started to stick, the rubber membranes under it tore and fell off, and the key’s plastic internals eventually broken due to excessive mashing to “un-stick” it.
Fixing an HP 15-cw0055nr Keyboard can be Cheap or Easy – Not Both!
Normally when a friend or family member needs a new keyboard for the laptop I’m happy to help because there are usually just a few screws to remove and a ribbon cable to detach, plus they are usually under $20 on ebay or amazon. However, fixing this HP 15-cw0055nr proved to be a bit more difficult unless I wanted it to be a more expensive fix.
It turns out that these super slim HP 15-cw0055nr laptops do not have an easily removable keyboard. Unlike most laptops that have a few screws on the bottom that hold the keyboard down, these HP 15 series laptops must have the bottom cover removed and the internal components completely disassembled to get to the keyboard and remove it from the palm rest. Everything must come out – speakers, fan, motherboard, battery, hard drive, USB port sub-board, and the screen/lid must come off. This is true whether doing the easy fix, or the cheap fix!
Once all of the internal components were removed there was a clear plastic separator between the motherboard and metal keyboard backer plate to stop them from making direct contact – the clear separator was covered in dried sticky beer and it most definitely saved the motherboard from being fried. After removal, quick clean with soapy water and the clear sheet was as good as new!
Here’s a video of someone taking apart an HP 15-cs series laptop which is very similar to a 15-cw and is a good reference for getting the bottom shell removed. Sadly I did not take a video or photos when I did this repair so the below video will have to suffice!
The Easy/Expensive Fix for a Bad HP 15-cw0055nr Keyboard
If you just want to fix your HP 15-cw0055nr keyboard as fast and painlessly as possible then just buy a complete HP 15-cw palm rest from ebay and toss that bad boy on. It’s going to cost about $86.00 or more but it will definitely be easier than the next method!
The Cheap/Hard Fix for a Bad HP 15-cw0055nr Keyboard
If you are like me then you don’t like replacing expensive assemblies just because of one bad part on the whole assembly. Rather than replacing the entire HP 15-cw0055nr palm rest with keyboard bezel, keyboard, keyboard backer plate, plus maybe even the touch pad… I wanted to replace JUST the keyboard.
Removing the HP 15-cw0055nr Keyboard from it’s Palm Rest
The problem with that is.. they keyboard is held into the keyboard bezel by a backer plate that is in turn held onto the palm rest by plastic rivets. You will see the rivets once all of the laptops internal parts are removed – they are little flat 3mm wide circles of black plastic going all around the perimeter of the keyboard, plus a couple in the center.
To remove the plastic rivets you could heat up a soldering iron and then just scrape the rivets away – or you could do what I did and just use a small hammer (or anything hard with a bit of weight) to strike a small flat head screw driver held at an angle against the edge of the rivets to sheer the plastic rivets right off of the backer plate. It sounds difficult but it literally took me 20 seconds to knock all of the rivets off. Save the sheered off rivet heads, you might need them later (depending on how much of a perfectionist you are).
Here’s a video of a guy removing plastic rivets on an HP 14 series laptop by using a soldering iron to melt the plastic and a flat head screwdriver to scrape the plastic away. It would be much easier if he had a flat and wide tip on his soldering iron to do both jobs with one tool.
Finding an HP 15-cw0055nr Replacement Keyboard Online
The next problem is that because these keyboards aren’t meant to be removed, nobody sells them separate outside of the palm rest – I tried all the model numbers on the keyboard and found nothing online! However, I started searching the web for keyboards to similar HP 15 series keyboards and I found one on Amazon for HP 15-bs series laptops that looked very similar to the HP 15-cw0055nr keyboard except it was black and had a longer cable. There are other more expensive listings on Amazon for the same keyboard but the cheapest can be found on ebay if you can wait a longer than Amazon’s 2-Day delivery (plus they have silver).
Once the keyboard arrived I tried it out and it fit perfectly, almost…
Replacing HP 15-cw0055nr Keyboard with HP 15-bs series keyboard
When putting the new HP 15-bs series keyboard into my HP 15-cw0055nr laptop the right edge when viewing the back of the keyboard was being slightly obstructed by some plastic on the edge of the palm rest near the keyboard bezel. Because the plastic in the way housed some screw holes for the laptop internals I decided to shave the side of the keyboard rather than risk weakening the palm rest’s screw holes. There were just two spots about .5cm long that needed to be shaved down about .5mm which was easily achieved with a small file and 10 seconds of time.
After making the two tiny indents on the keyboard’s metal edge it slipped right into the keyboard bezel. However, there were a few notches on the bottom edge of the keyboard that didn’t line up with the nubs left from the plastic rivets I sheered off and those too just needed to be filed down. After that the HP 15-bs series keyboard was a perfect fit in my sister’s HP 15-cw0055nr laptop. To deal with the extra length on the keyboard ribbon cable I just added two extra folds to the cable in a spot where the extra thickness wouldn’t be in the way – it worked fine.
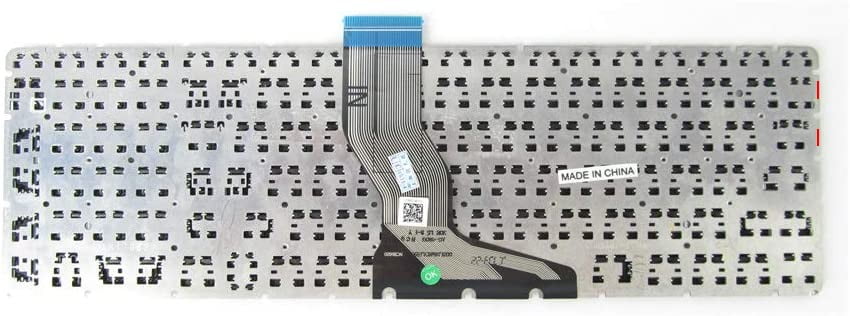
Below is an image representing the amount of metal in red that had to be filed off of the keyboard to fit. It is an approximation after the fact and the location of the filed areas may actually be up or down some (I can’t remember exactly) so don’t use this image as a template – actually put your keyboard into the bezel and see exactly where it needs to be filed down.
I figured the laptop internals would mostly hold the keyboard and backer plate in position so I didn’t bother worrying about the plastic rivets, and I was 99% correct. The center of the keyboard had a very slight sag that it did not have before – to cure this I used a few of the sheered off plastic rivets and I carefully super glued them back onto the center positions of the keyboard where nubs from the keyboard bezel were originally riveted onto the backer plate. I used a gel based super glue that would not run through the cracks before drying and I was sure to apply pressure while it was drying to make sure the backer plate and keyboard were firmly pressed against the keyboard bezel. Problem solved! Another effective method would be to melt all of the plastic rivets back onto their nubs using a soldering iron.. or if you don’t care about being perfect just put a strip of thin cardboard, folded paper, or rubber behind the center of the keyboard and backer plate.
Conclusion – TL/DR
Complete disassembly took about 20 minutes including the sheering off of the plastic rivets and keyboard removal, cleaning the beer off of internals took 5 minutes, and reassembly took another 35 minutes including the slight modifications to the keyboard and palm rest to make them work together. So for an hour of time I saved $69 by installing an HP 15-bs series keyboard into my sister’s HP 15-cw0055nr laptop – plus I only had a broken keyboard to dispose of instead of a broken keyboard and an entire plastic palm rest. I’d say I made the right decision.

John started JSnowCreations as a place to post random tech guides and product reviews. However, while shopping for his daughter’s first “big girl” bed in 2019 he learned about the hidden dangers of fiberglass in mattresses. Since then, John has made it his mission to expose as much hidden fiberglass in mattresses as possible. His ultimate goal is federal regulations that ban fiberglass from being used in mattresses, or at least a law that require it to be listed in the material tags.